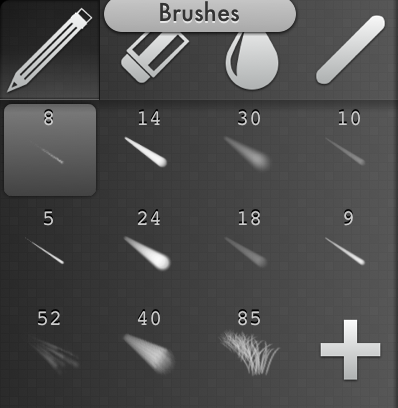
The top row of the brushes palette shows the four main brushing tools: draw, erase, blend, and line. All of the brushes below the top row will work with any of the brushing tools. Each tool will remember the last brush you had selected under that tool. If you are drawing with a small brush and move to the eraser, changing it to a large brush, your small brush will be back when you switch back to the drawing tool. Likewise, when you move back to the eraser, the large brush will be selected again. When you first open the app, each brush tool will by default select the brush immediately under its own icon, this way you can set your favorites to the first four positions so your brushes are the way you like.
Tapping on the blending tool icon will bring up a popover with 3 tool options: blend (water drop icon), dodge (sun icon), and burn (cloud icon). The blending tool will set the color of the brush to the average color of what is underneath it. Using the blend tool with a soft, low opacity brush will let you create a smooth transition between colors. The dodge tool does the same as the blend tool, but will lighten the area underneath, and the burn tool will darken. The manner in which the dodge and burn tools lighten and darken are determined by the three sliders: highlights, midtones, and temperature.
Tapping on any of the brushes will select it. You can edit the current brush by tapping on it again. Brushes can be rearranged by tapping and holding, then dragging it to the desired location. Brushes can be deleted either by scrolling to the bottom of the brush settings display, and using the "delete brush" button, or by dragging the brush far off to the side when moving it. The "+" button will add a new brush identical to your currently selected brush.
To create a brush that uses an image/pattern as its base, draw the image you wish to use, then select it using any of the selection tools, and tap the "new brush from selection" button on the selection options view which pops up after the selection has been made.
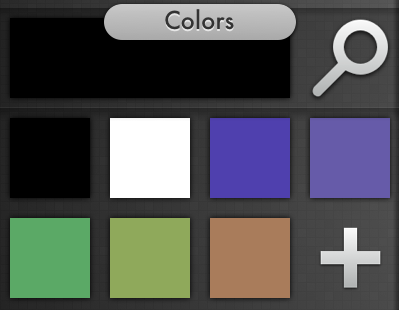
The top row of the color palette shows the current color, and a magnifying icon representing the color sampling tool. The current color is used for brushing, and for filling layers or selections. If you tap on it, a larger color picker than the one displayed over the image will appear. This color picker also includes an option to set an exact color RGB value. To use the color sampler, first tap on the magnifying glass icon, then tap the point on the image you wish to take the color from. You can also tap and hold on the image at any time to choose the color beneath your finger.
The rest of the color palette displays saved colors. You can add the current color to the palette by hitting the "+" icon, move the colors by tapping and holding, then moving to the desired location, or delete the colors by tapping and holding, then dragging the color off past the side of the palette.
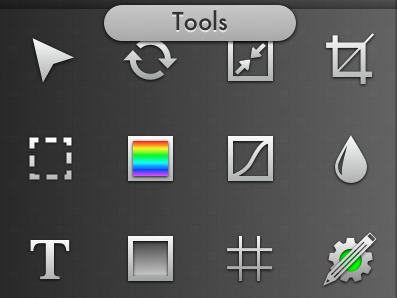
In order, the tools are Move, Rotate, Scale/Change Canvas Size, Crop, Rectangular/Circular/Lasso Selection, Hue/Saturation/Lightness, Curves, Blur, Text, Gradients, Guidelines/Mirorring, and Stylus Settings. A description of each can be found below.

The move and rotate tools can be used to move/rotate a layer (but not currently a selection). Please note, if you're using layer blend modes other than "normal", the layers will display under the "normal" blend mode while using the move and rotate tools. When you move away from the move/rotate tools, the layers will display correctly again.


After a selection is made, a popover will appear giving you a few options to deal with it. You can clear the selection, create a new layer from the selection, and you can fill the selection with the current color.

The Hue/Saturation/Lightness controller allows you to alter the look of the current layer (multiple layer selection not yet supported). On the top of the control you see two hue selectors labelled "before", and "after". These are for convenience to allow you to change the hue such that green becomes blue, for example. Despite the fact that you can indeed select a specific before color, there is currently no color replace tool, the hue of everything in the layer will be altered.Please note, if you're using layer blend modes other than "normal", the layers will display under the "normal" blend mode while using the move and rotate tools. When you move away from the move/rotate tools, the layers will display correctly again.

The Scale/Canvas size tool allows you to change the size of your image. By default, the width and height fields will adjust each other to keep the same ratio so that the image doesn't get distorted when scaling. To disable this, click on the lock icon to the right of the width/height fields. The selector beneath the width/height fields is only used for canvas size changes. It allows you to select which corner/side of the image will stay in place, and where extra padding will be added if you increase the size of the image, or conversely what area of the image will be cropped away if you shrink the image.

Curves are a way to alter the brightness and contrast of an image (multiple layer selection not yet supported). Curves work somewhat similarly to the equalizer on a sound system (A more accurate analogy would be to a dynamics processor). However, instead of making bass sounds or treble sounds relatively louder or softer, with curves you can make the dark areas or light areas darker or lighter. In this way you can increase or decrease contrast, and control in a sense where that contrast occurs.
From left to right, the curves graph goes from dark to bright, just as the equalizer goes from bass to treble. However unlike the equalizer, the vertical component of the graph also goes from dark to light, rather than quiet to loud. This is why the base line of the curves is diagonal. The bottom left point means that "pixels which are initially black (are on the left) will remain black (on the bottom)". The top right point similarly means that "pixels which are initially white (on the right) will remain white (on the top)".
Similarly the center point from left to right starts as the center point from bottom to top. If you pull this center point up, it means pixels originally of medium brightness (center left to right) will in the resulting image be brighter, since they are now higher from the center from bottom to top. In this manner, the curves displayed at the beginning of this segment show an image in which the shadows are lightened in order to reveal shadow detail, whereas the bright areas of the image remain mostly unchanged. Everything of less than middling brightness in the resulting image will be brighter than it was originally.
Please note, if you're using layer blend modes other than "normal", the layers will display under the "normal" blend mode while using the move and rotate tools. When you move away from the move/rotate tools, the layers will display correctly again.

Inkists crop tool currently does not allow for the selection of specific sizes or cropping ratios. For a specific size, I would recommend cropping to near what you want then using the canvas size tool to get to the exact pixel value desired.

The blur icon provides you with a single slider to blur the current layer (multiple layer selection not yet supported). It uses a gaussian blur approximation which is implemented (as of version 1.0) with the application of three successive box blurs. Please note, if you're using layer blend modes other than "normal", the layers will display under the "normal" blend mode while using the move and rotate tools. When you move away from the move/rotate tools, the layers will display correctly again.

When the text tool is selected, you should first draw a rectangle in which to draw the text. A new layer will automatically be created to contain the text. A popover will come up with options to type in the text, set a drop shadow, and a button to bring up the system font picker to choose font/size. Text layers are currently saved as bitmap layers like any other layer and the text can't be altered after applied.
Tapping the gradient icon will bring up a popover that allows you to select the start color, end color, and whether you want a circular or linear gradient. Once selected, dismiss the popover, and drag your finger along the image to set where you want the gradient. The gradient will be drawn on the current layer when you release your finger.
Tapping the guidelines icon will bring up a sheet to add vertical or horizontal guidelines to the image using either a pixel number value, or percentage value. This sheet also has options to turn on mirroring for brush strokes.
Inkist currently supports three pressure sensitive styluses: Adonit Jot Touch, Pogo Connect and jaja. Additionally, Inkist can draw using only the stylus touch (ignoring accidental input) using the Pogo Connect, or Jot Touch BT4 pens (It does not work with the original Jot Touch). To use one of these pens, you must first enable it using the on/off toggle inside the stylus settings popover, and then depending on the pen you may need to connect it under the specific pen's settings.
When using a stylus that screens out errant touches, please note that in order to increase the success of the palm rejection, Inkist disables pinch-to-zoom around the edges of the image frame, so that you can feel more confident resting your palm along the edge of the iPad. As such, if you are pinching and it isn't working, move your hand towards the center of the screen before doing so.
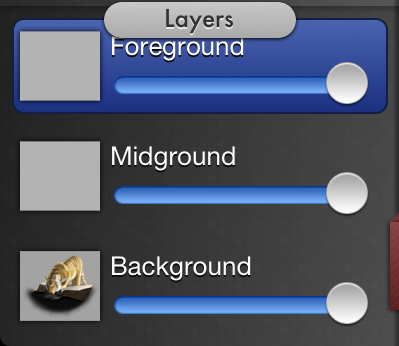
The three layers are always displayed in the layer view with a small preview as well as a slider to set opacity. The layers can be selected by tapping on them and rearranged by dragging them. Just like the brushes, you can access more settings options for a layer by tapping on the currently selected layer. These controls will let you change blend modes, fill the layer, merge layers, lock opacity, and clear the contents.
Please note, if you're using layer blend modes other than "normal", the layers will display under the "normal" blend mode while using the move and rotate tools. When you move away from the move/rotate tools, the layers will display correctly again.

The icons on the controls strip from left to right are: Export/Document Management, Settings, Undo, and Redo.
While Inkist autosaves periodically, you can save manually at any time by going to settings > quicksave. If you wish to undo past the number of steps saved in the undo history, you can also revert to the point of the last manual save from the settings button. You can also switch which side you wish the interface to appear on in the settings.
Gestures are partially customizable under the settings button (gear icon) > gestures. The gesture to tap and hold to select color may be turned off, and two finger double tapping and three finger double tapping may be customized.
You may quickly control the size and opacity of your currently selected brush by using a two or three fingered swipe up/down gesture for each. This gesture must be performed over the sidebar that contains the brushes/colors/tools.
Inkist will periodically autosave your file as you work on it. If you wish to manually save your progress, you can do so by tapping on the settings icon on the control strip (gear icon) and tapping the quicksave button. Your progress will also be saved when you enter the document browser (first icon on the control strip).
All exporting is done from the document browser. To export an image, tap on the image you want to export to select it, then tap the button labeled with the file format you wish to export to (JPEG, PNG, PSD, ISImage). Inkist may take a few seconds to convert the file to the appropriate type, then a sharing popup will appear letting you email, or save the image to your iPad's photo library depending on filetype. You may also be able to open images in other apps on your iPad from this popover.
If you try to email a PSD file, please be aware that the PSD files generated from Inkist are very large as they are uncompressed. Therefore they may be too large for your email to handle. It is recommended you handle PSD files through iTunes file sharing or using a document management app.
To use iTunes file sharing, first generate the PSD file by selecting your image and pressing the PSD export button and waiting for the sharing popup to appear. At this point, the converted PSD file is being stored by Inkist. Connect your iPad to your computer, and view it in iTunes. Go to the apps tab, then scroll down to file sharing. Find Inkist in the list of apps and you'll see a list of files. It should have ISImage files for everything in your image browser, and the PSD you just exported. You can save to your computer from here by dragging the file to your hard drive, or right clicking and using "save as". ISImage files can always be accessed through iTunes file sharing, and all exported PNG, JPEGs, and PSDs can be accessed so long as you don't close and reopen the image browser. You may also use the image browser to import PSD and ISImage files to Inkist.
If you wish to access the individual layers of your image on your Mac or PC, you can use the ISImage file either by emailing the image to yourself, or using iTunes file sharing as described in the previous paragraph. On a PC, the ISImage file will appear as a folder, and the layers will appear as .png files within that folder. On a mac, the ISImage file will appear as a document. Right click on the file and select "show package contents" to view the contents which contain the individual layer files.
There are a number of ways to import files into Inkist. Flat files such as PNGs, TIFFs, and JPEGs which can be stored in your iPad's photos library can be accessed from the image browser by tapping on the camera icon on the top left. PSD and ISImage files can be opened from other apps using the standard "open in" functionality, which is usually accessed by tapping and holding on the document, for example, if you have an ISImage file in an email, tap and hold on it until the "open in" popover appears and use that to open the file in Inkist.
To use iTunes file sharing, connect your iPad to your computer, and view it in iTunes. Go to the apps tab, then scroll down to file sharing. Find Inkist in the list of apps and you'll see a list of files. It should have ISImage files for everything in your image browser, and the PSD you just exported. You can drag PSDs and ISImage files into Inkist's list of files from here. The next time you load the image browser in Inkist, the files should appear. In the case of PSD files, they will be converted to ISImage files when you open the image browser. This will take several seconds.
Other Questions? Contact via email. Please check the documentation on this page before emailing.